Last time I showed the start of my trees. I said this time I'd talk about finishing them off.
The first part of that involves adding water to those basis with ponds. I used the filler to create the edge of the base, added rocks and bits of coffee stirrers for a small pontoon.
I used Woodlands Scenics Magic water to create the water. I'm aware that you can buy another product called Water effects, both Woodland Scenics and Vallejo sell them. This allows you to create extra effects on the surface of the water.
I've ordered some of that to see how it works. It is also possible to add texture to Magic water, a toothpick works fine if you can be around while its drying. It's possible to mess it up at various stages in the drying process in order to create effects..
I think on reflection I made a mistake with the base under the water. I wasn't sure what the final finish would be so I tried tan and blue, it looks decidely iffy. Next time I'll do better!
Right, back to painting and finishing these pieces of scenery. If I'm leaving alot of earth on show I do multiple colours dry brushed on. If I'm using a lot of flock then I opt for a dark brown and get the flock everywhere.
This first base with two trees on it, has a felled trunk along the front, plus a few rocks pressed into the filler, they have been painted around.
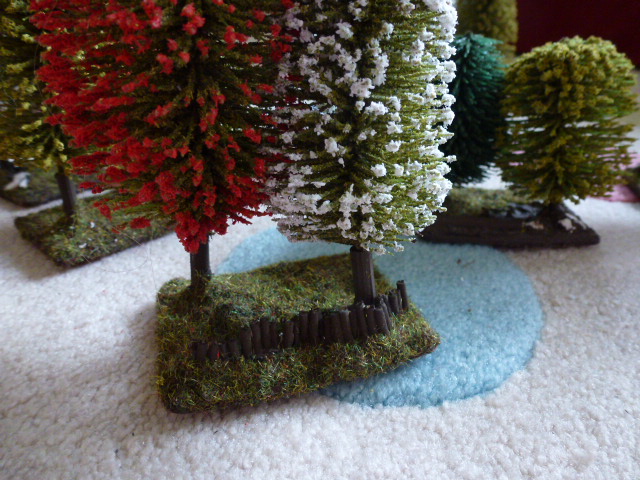
I've created a worn out fence line along the edge of this base. The rest of the base is heavily flocked.
This pair of trees was raised up a little on the base and more putty added to create a natural channel. In Flames of War infantry can pass between man wide gaps in buildings, so I thought this was quite a nice, if superficial scenery effect. Actually as I type this up I can see that the earth around the tree needs some dry brushing to finish it off well. I'd better get on that too!
The same base from the side.
I've painted up the stones a little on this base, I like the effect, it's almost snow like. Also a couple of bits of kebab skewer make great stumps.
My flocking process is very simplified. I mixed up lots in advance of painting my Germans, and it's getting used everywhere. There is standard flock in there, some grit, small random particles. Lately some Norwegian moss has crept in there. What I feel I should have done is kept the recipe!
Soon I'll run out, but I hope all my Germans will be done then. The Russians will have to have their own blend. I've simply taken a few pictures to finish off. I add my flock in the following way. 1) Brush plenty of PVA on, a good coating, but you don't want it running off, just running in.
2) If you're flocking a bunch of models then brush on all the PVA.
3) After it's well coated, I leave it for 5 min, then I start adding the flock.
4) I sprinkle it on, rubbing it between my forefingers and thumb as I go - just like breaking up a stock cube.
5) Once it's well coated I turn the model over and tap, tap, tap. Loose flock falls off and lots that's sticking starts to stand up.
6) I repeat the adding process until I'm happy with the amount on there.
7) Let dry and enjoy when you play.
If you read the last article on my blog you'll know it's taken me two months to add this part 2. That isn't because I'm slow at making trees, it's because I've been lazy in adding articles because I've been making up some really lovely pieces of scenery, some 30cm (1ft) squares. More on them soon!


No comments:
Post a Comment